

How To Print Multiple Templates At Once On Cricut
Hi Daydreamers!
Today yous are going to learn how to Print Then Cut images with your Cricut Maker or Explore.
To cutting printables, stickers, and other types of images, you need to utilise the Print so Cut setting.
Print then Cut is an selection that allows you to print your designs and so cut around them. When you accept an element or design set to "Print then cutting," Design Space will send it to your dwelling house printer first, and then it will cutting it.
This commodity volition cover what type of images yous tin can use, the machine specifications y'all need to know, Design Space tutorial, the cutting process, and terminal merely not to the lowest degree, what to practice if you are having issues with the Print then Cut setting.
If you lot are a beginner and are still figuring out Cricut'south software, I recommend that you read my fantastic andUltimate Cricut Design Space tutorial.
Are you ready?
Let'south brainstorm!
Print Then Cutting Specifications
Information technology would be best to proceed in mind a couple of things before you kickoff using this feature.
The commencement thing to consider is the overall size of your design.
The maximum size of the elements yous will be printing can't be larger than 9.25. x 6.75 inches, and the paper size you need to print on has to be 8.five x 11 inches; (these settings can't exist changed).
The second thing you need to consider is your machine's specifications. This is what each auto is capable of.
- Cricut Explore Family Machines: None of the Explore machines have the capability to Print Then Cut on different colors or very reflective textile; brand sure to impress on white paper with a matte finish at all times.
- Cricut Maker: This machine has a more powerful sensor, and it allows us to cut on colored and reflective paper. However, don't employ very dark colors or a very decorated design paper because the sensor won't be able to detect it either.
- Cricut Joy: It doesn't support Print and so Cut
What types of images tin I cutting with the Impress so Cut Feature?
You lot can Print and then Cut whatever image you tin can upload to Design Space and/or is available on Cricut Access. In other words, annihilation you can identify on the canvas area – where you design – can be printed and then cut.
Besides, call back beyond images; y'all can impress and cut text you blazon in Design Space, shapes filled with Cricut or uploaded patterns, and more than!
I won't item how to upload each blazon of epitome because I will be writing a very extensive postal service about it soon. However, I desire to mention 3 types of images and the differences you need to know to take a skillful experience with the Print then Cut setting.
1) Images With a Solid Background
These types of images are often very busy, or they unremarkably accept a solid groundwork. They require extra work because you need to isolate the image you lot desire to cutting.
Yous run across, when y'all upload these kinds of images, Cricut tin can't read what the image is all about.
Information technology tin only read the edges of information technology. And so, unless y'all want to cut the whole matter and not something inside information technology, you would demand to delete the background.
These images have certain names and/or extensions and you can recognize them when they end in .jpg, .gif, .bmp.
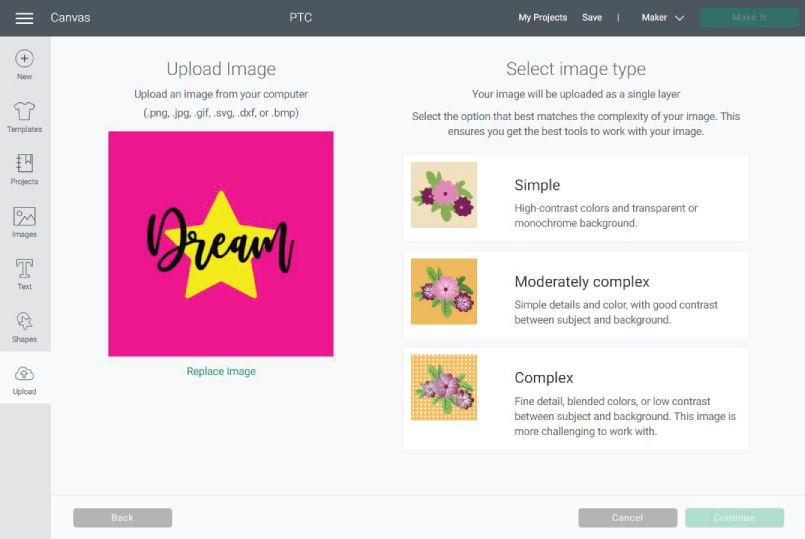
For example, If you only wanted to cut the word dream and the star behind it, you lot would demand to delete the pink background color; otherwise, you would print the whole design and cut a square.
Yous can do this in Cricut Design Space very hands, and I will comprehend how to do it in the step-by-stride tutorial.
2) Images with a Transparent Background
These images are the perfect fit for the Print so Cut selection because the main image, text, or element you want to cutting is isolated and placed on a transparent background.
However, these images tin can lose some of their quality and await pixelated if you endeavor to brand them bigger.
You tin can recognize them when they end in .png.
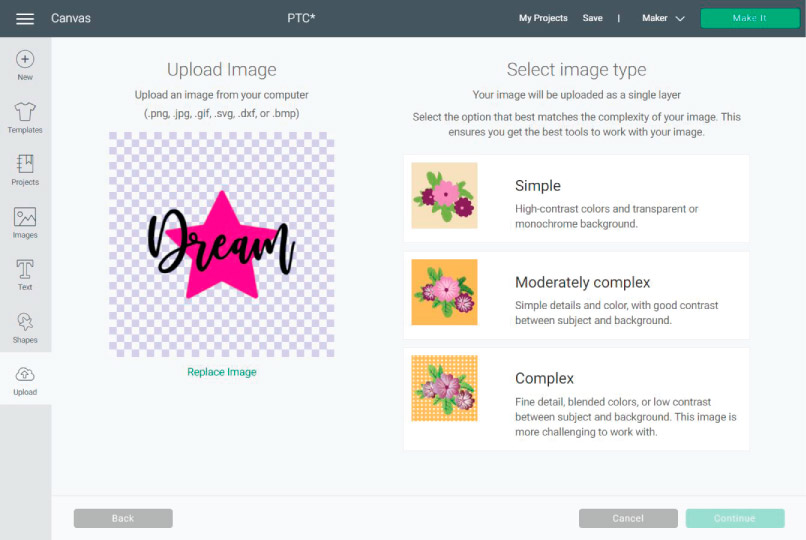
Those little grey and white squares represent transparency. Therefore, you don't have a background to delete, so if you set up this image as a "Print and so Cutting," the bract will go around the give-and-take dream and the star.
Yet, since this a single image, you can't split up the star from the word.
3) Vector Images
These are the best images you can use across Cricut Pattern Infinite. They are also chosen SVG or Cut files. The proficient matter about SVG files is that you can resize them without losing any quality.
You can recognize these images when they end in .svg or .dxf
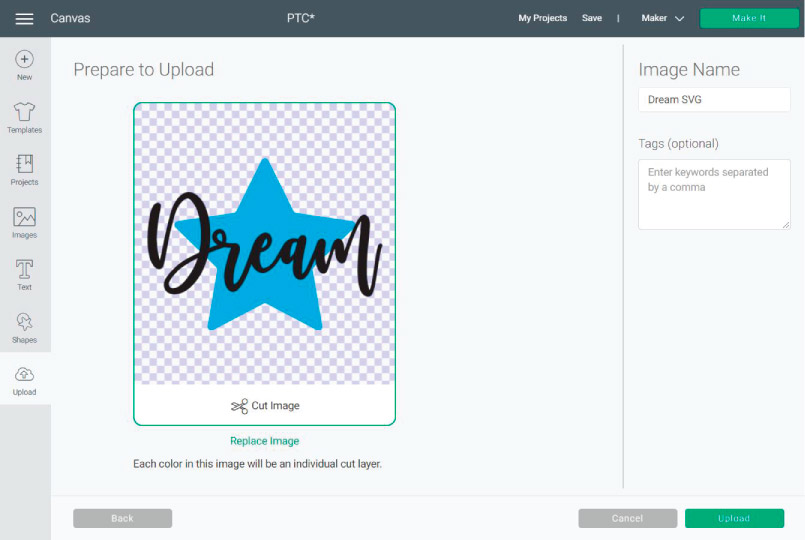
As you tin can see hither, you don't have the same options you did with the first two types of files. With SVG files, the bract knows where to go and where to cut.
With vector files, you can as well edit the star and the word separately, alter colors, and other things that you lot wouldn't be able to do with either JPG or PNG files.
Here'southward the caveat, though; when using Impress then Cut with SVG files that overlap each other or take unlike colors, y'all demand to use the option FLATTEN. Don't worry. I volition show yous how to do this on the Step by Stride tutorial.
Print so Cut Step by Step tutorial
Let's put our Cricut to work now that you know what kind of things yous can cut and your machine's specifications.
I know I've said more than enough, but I assume you know nothing when you come up to read a mail. It's essential for me that all of my readers – a.k.a daydreamers – feel they can follow step by step.
This is a functional tutorial, and It'south not meant to look super pretty or anything like that. It's meant to teach yous all of the possibilities you have with Print then Cut.
These are the following things we are going to use:
- JPG Image
- PNG Image
- SVG File
- Cricut Design Infinite Shapes
- Patterns
- Gratis Images from Cricut
- Text
Ready, Set, Go!
Upload Images to Cricut Pattern Space
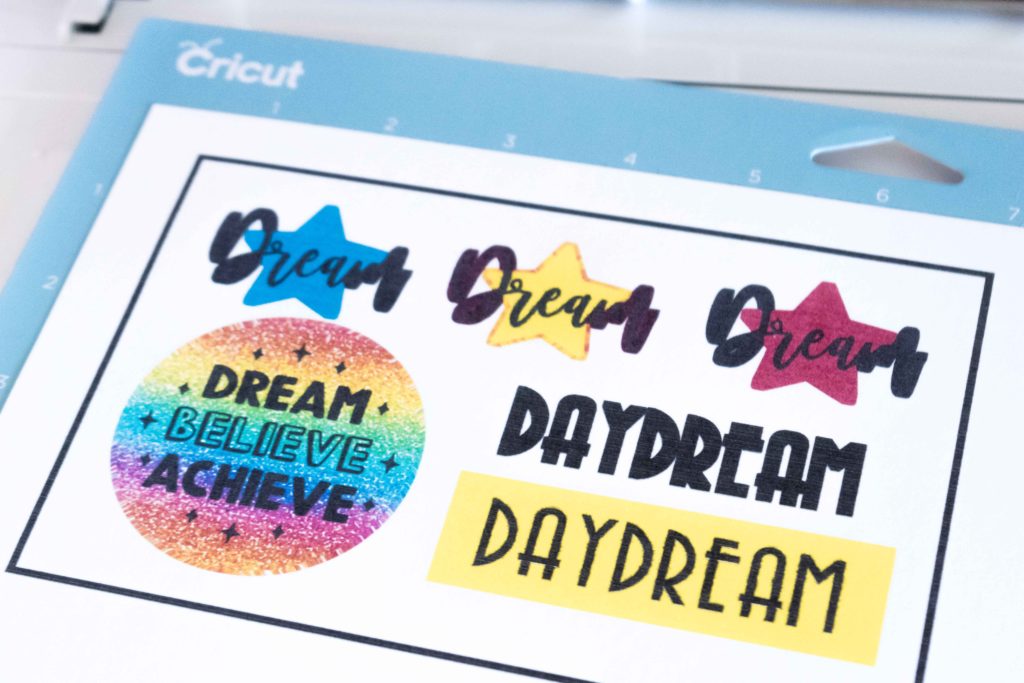
We will be using the images that I showed y'all at the first of this post.
To download the files, y'all NEED to be on a desktop or laptop, and you must click on the button to trigger a download file on your pc.
Depending on your browser settings, sometimes your PC will ask where to save the file, although, most times, the files will exist in your download folder.
If the image opens in a new window (this may happen because of your browser settings), right-click on it, select the choice "Save Image Equally," and choose where you want to relieve the file.
SVG files expect like a web page file when you download them.
Annotation: We volition be doing the full JPG file here (Pink Groundwork) and have you do information technology with the PNG and SVG file using the concepts I explained on the types of images you could employ.


Oh!
And only and so you know, I too take a library full of free SVG files and Printables for all of my subscribers, a.k.a Daydreamers. You can see a preview right here or become access by filling out this form.
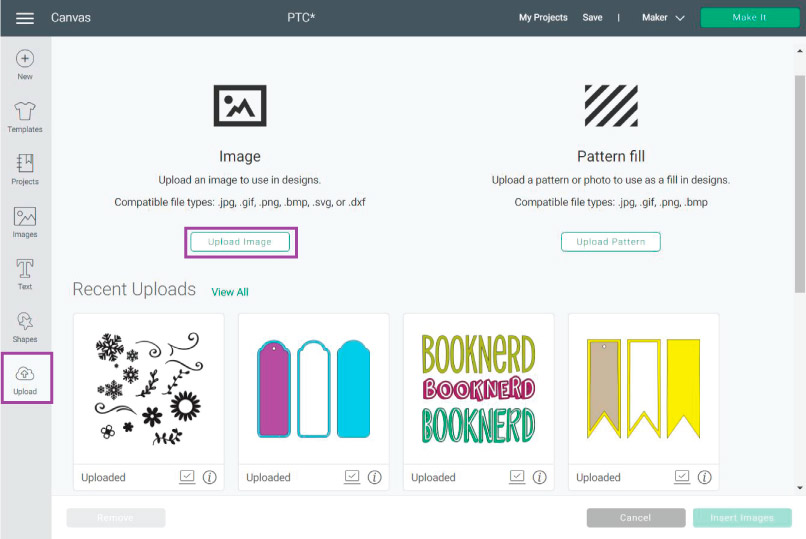
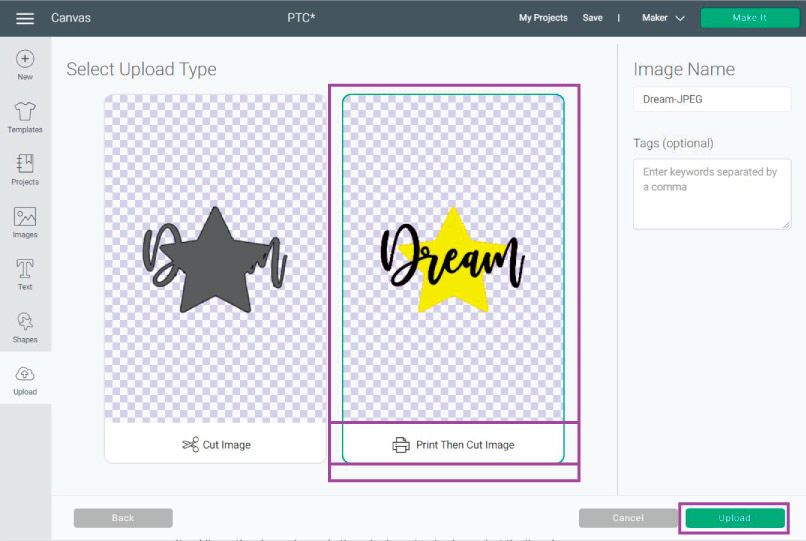
Later on saving the images on your computer, log in to your Cricut Design Space and and so click on the left panel area'due south "Upload" button. So click on the "Upload Image."
When you do this, a new window will popular upward asking you lot to locate the file on your figurer. Search for the image and double-click on it to upload information technology.
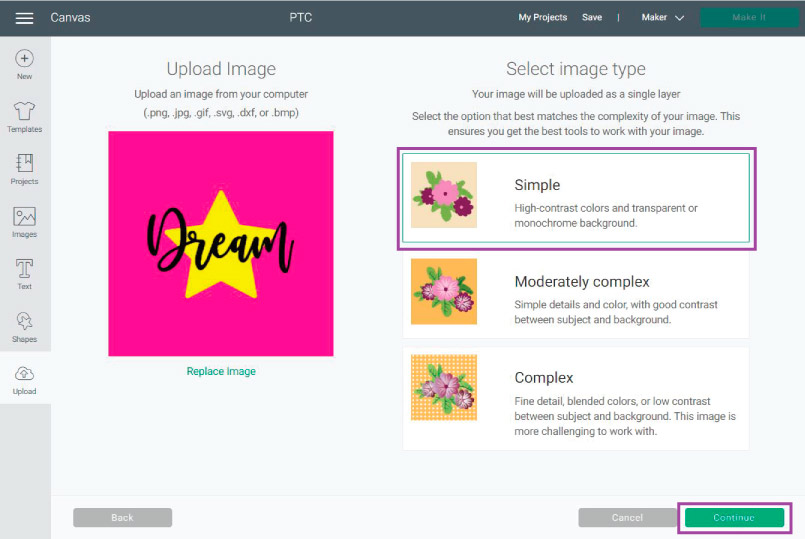
Hither we are working with a JPG file; therefore, Cricut doesn't recognize all of the designs that are in in that location. If you add it like this, Cricut will Impress and Cut the whole square.
For this project, we are only going to use the word Dream and the yellow star. But, before we tin do it, nosotros need to get rid of that pinkish background.
How do we do that?
Easy! Since this design has just 3 high contrast colors, select the Simple pick to modify the file further and click on proceed.
Here you take different options to clean up the file, and you can play with them to come across which one is better. However, my favorite way to do it is by using the little "Magic Wand" on the left upper corner.
Select the "Magic Wand" and then click on all of the pink areas to delete them. It will have a couple of clicks to get rid of all pink. After you're done, click on continue.
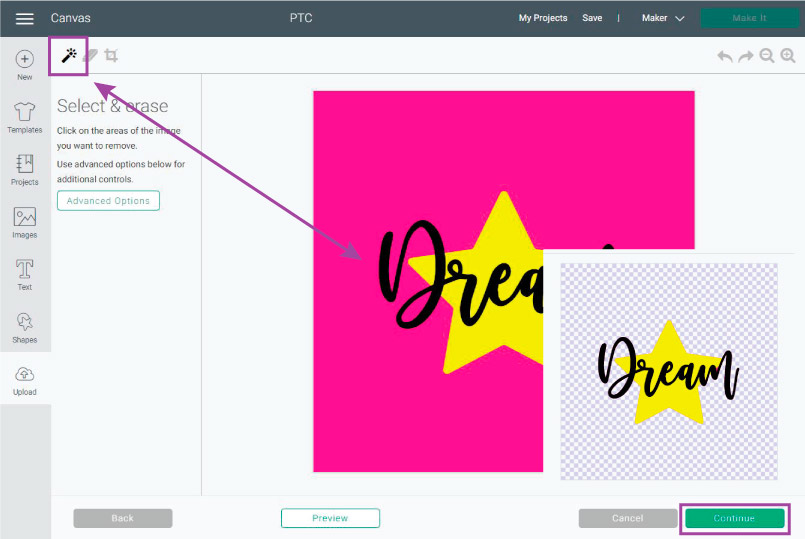
Now you have a transparent groundwork, which ways that the bract will cut around the give-and-take dream and the star.
IMPORTANT Notation: Even though this method deletes well-nigh of the pink background, a few pink dots are left on the star's edge and the word dream. I decided to go along like that, but you tin can keep cleaning the file with the eraser tool located next to the magic wand.
On the adjacent step, you will see that you accept two options. The starting time one is to save the file as a "Print So Cut Prototype," and the second one is to save the file every bit a Cutting image.
Select the first pick and click on "Upload."
Out of the three images I provided you with to recreate this tutorial, the JPG one was the near complicated. So, you lot are set up to upload the other ii on your own.
The PNG paradigm – dream and pink star – already has a transparent background and then that you lot would practise the same procedure:
- Upload Image
- Select Simple
- Don't delete anything with the magic wand and click on continue.
- Save as a Print then Cutting.
The SVG file is the easiest to upload. You lot simply need to upload, proper noun it and finally relieve information technology.
When you are washed uploading the third file, go ahead and select all files and click on "Insert Images."
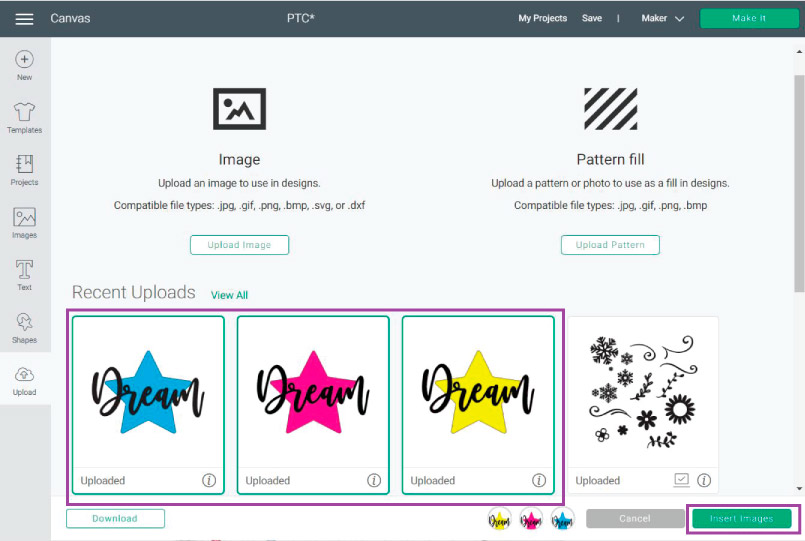
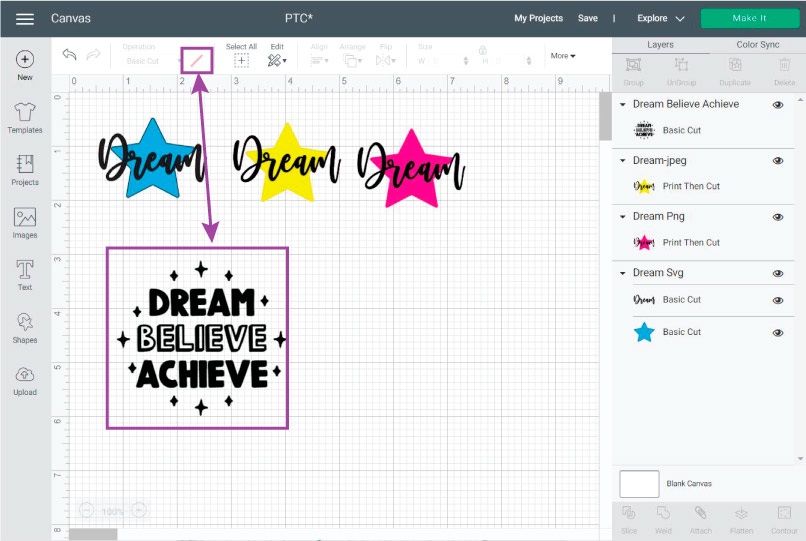
All files should now be within the Cricut Design Space Canvas Area. Almost likely, they are all over the place, overlapping each other, and they also have dissimilar sizes.
Get alee and tide upwardly the canvas area, and so it looks like the screenshot downwardly beneath.
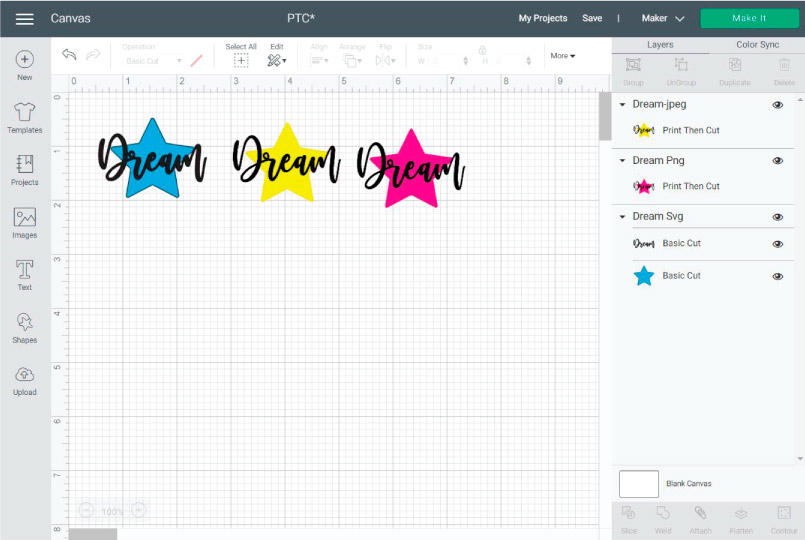
Picket out! You are about to read the near Important part of this tutorial.
If you were going to exercise this projection right now, your auto would only "Impress so Cutting" the designs with the yellow and pinkish Stars. (Retrieve we saved them with this pick in listen)
Why wouldn't Cricut Print and so Cut the design with the blue star?
The Respond is straightforward. This file is a Cutting or SVG file. Whenever you upload these files, your Cricut will assume you want to cut and zippo else.
How practise yous tell your machine to Print then Cutting?
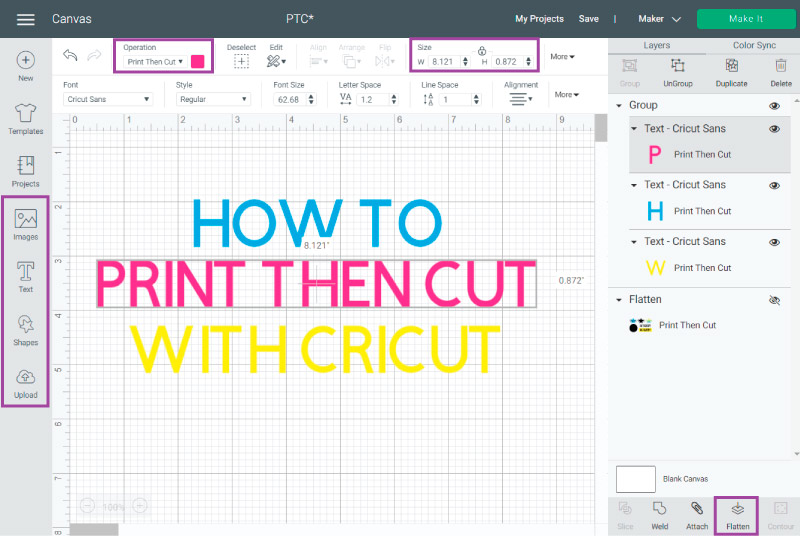
In that location are ii ways to tell your car that something needs to be printed and and then cut. The start one through "Operations" and the second 1 is "Flatten."
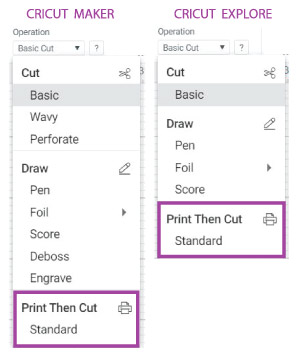
When wanting to "Print then Cut," your "Operation" ever has to be in "Standard."
The problem with "Standard" is that if you take cut files (blue star and word dream) that are overlapping each other or that also have unlike colors; instead of cutting around the edges as a whole, your Cricut will cut each design on a different Mat; and, even if you endeavor attaching them, one of the elements will cut through the other 1.
When using "Print then Cut," add all of your elements, text, add patterns, and at the finish, select them all and click on the "Flatten" tool located at the lesser of the Layers console.
I know this doesn't seem very easy. Merely, I want to explicate to you the LOGIC of how things work.
It'south been a lot correct?
Have a moment to stretch out, peradventure grab some coffee or a snack and let'due south explore more things y'all can "Impress then Cut;" And every bit I but mentioned, don't worry about "Operation." yet.
Print and so Cut Cricut Images
All Cricut Images can exist used with the "Standard" option. They really have cute stuff in their inventory. If you have Cricut Access, your possibilities are almost endless. Over 100.000 thousand images for y'all to choice from!
To get to them, click on the "Images" icon on the canvas's left console. You can search for images, categories, cartridges. You can as well search with keywords or filter them.
If you desire to apply something gratuitous – as I did – click on "Ownership" and select the option "Free." To find the exact paradigm I used, blazon in "Dream Believe Accomplish" on the search box.
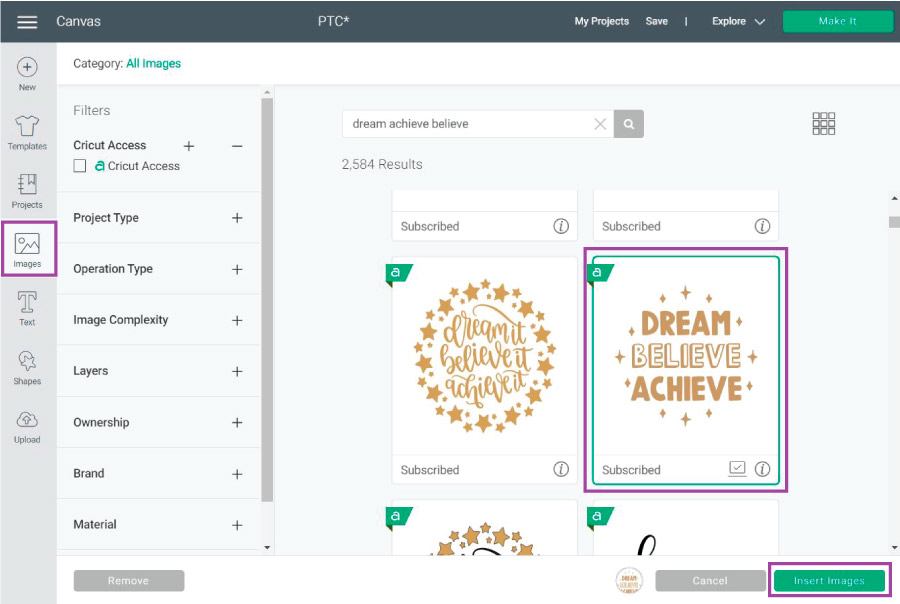
Once you lot find your favorite image, select information technology, and then click on Insert Images. I was non too fond of the original chocolate-brown color, and then I changed it to black.
Add Shapes and Patterns
I want my image to be on top of a shiny circle.
To add together a circle to the sheet area, click on the "Shapes" push button located on the canvass'southward left console. After clicking on the circumvolve, a grey circumvolve will announced on the canvas expanse.
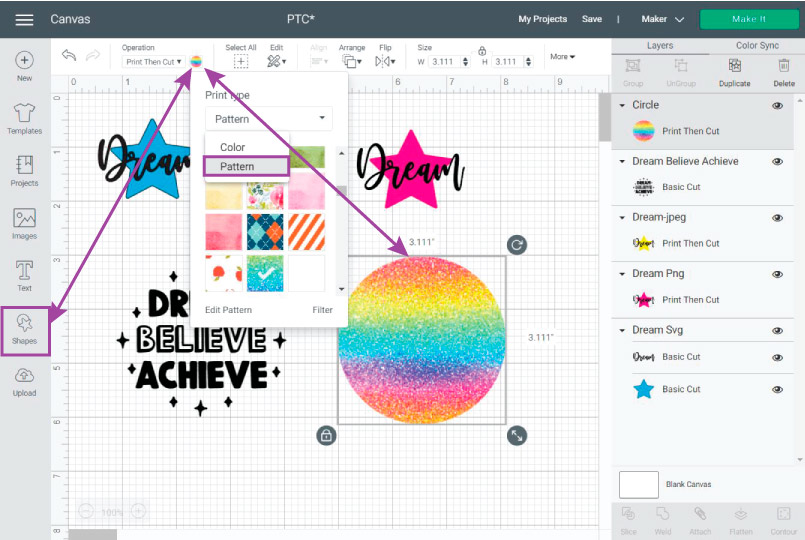
Let's change that grey color and by adding life with a beautiful blueprint. To do this, select the circle and change the operation from "Basic" to "Standard Print then Cutting," then click on the little square to change the "Print type" for "Pattern."
Now you go to pick your favorite Design. Cricut has hundreds of them, and they seem to be free for at present, so take advantage of this! I really liked the rainbow one.
Afterwards picking your pattern, identify the image (Dream, Believe, Accomplish) on height of the circle and center information technology.
Tip: Most likely, the circle will be on summit. To bring the epitome forwards, right-click on it and select move forward.
Add Print then Cut Text
Text adds then much value to any design!
"Print then Cut" wouldn't be the aforementioned without it! To add it, click on the text icon located on the left panel of the canvass area.
I added the aforementioned word twice to share a bespeak with you.
If you are using paper, it nigh likely is that y'all want the text to be together. If you exit the word on its ain, Cricut will cutting each letter; and If this is what you desire, great. Nonetheless, if you want the whole word to remain together, yous need to place it on superlative of a shape.
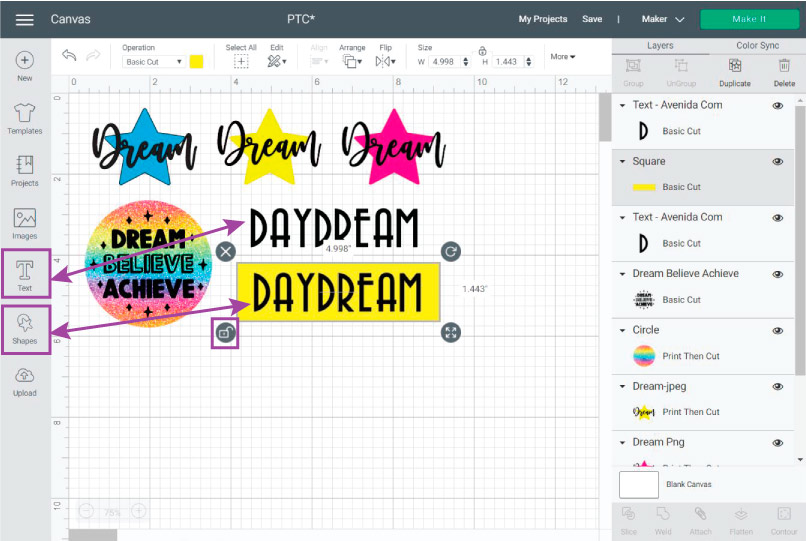
For this example, I added a square and unlocked its proportions to make a rectangle; then, I changed the color for yellowish and typed daydream on it.
Piece of cake, right?
Flatten and Resize your Design
We are a couple of steps abroad before we cut this project!
Practice y'all remember the talk we had about "Operation" and "Flatten"? Since we are washed with all of the designing, we demand to tell Cricut that all of the images, text, and shapes need to be Impress and then Cut.
If yous look at the layers panel – on the right – you volition come across that not all of the elements have the "Impress so Cut" attribute; some have only the "Cut" option.
Nevertheless, as I explained, you tin can't just change the operation from "Cut" to "Standard Impress so Cut." You need to compress all of the elements that make this project into Ane Single LAYER.
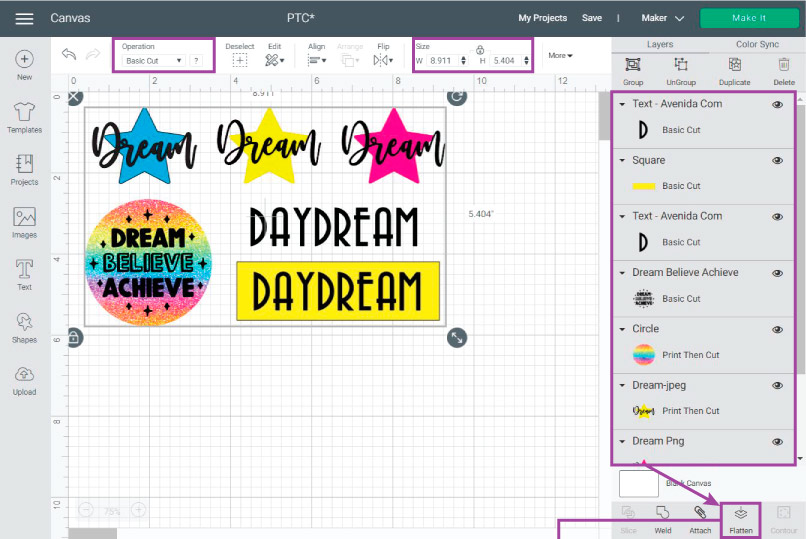
To do this, select all of the images, text, and shapes and click on the selection "Flatten" located at the Layers panel's lesser.
Notice that after flattening, you merely take 1 layer!
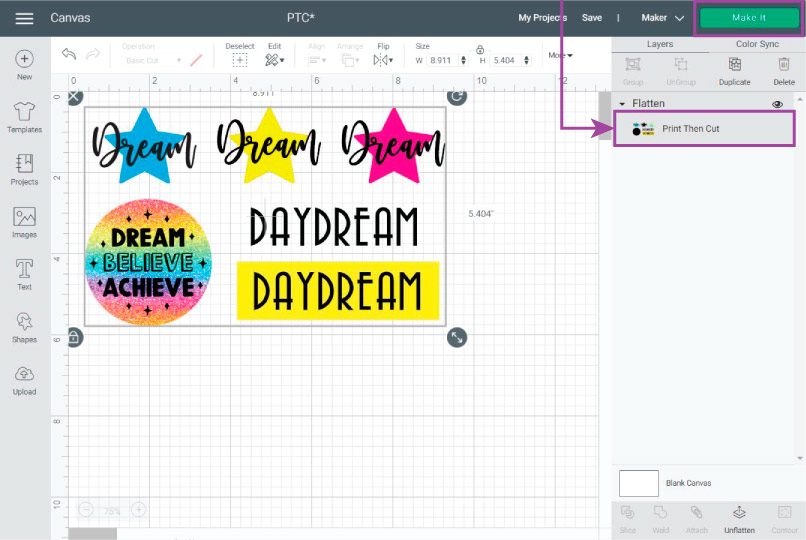
Now that we are done with the designing procedure, click on that "Make it" now button.
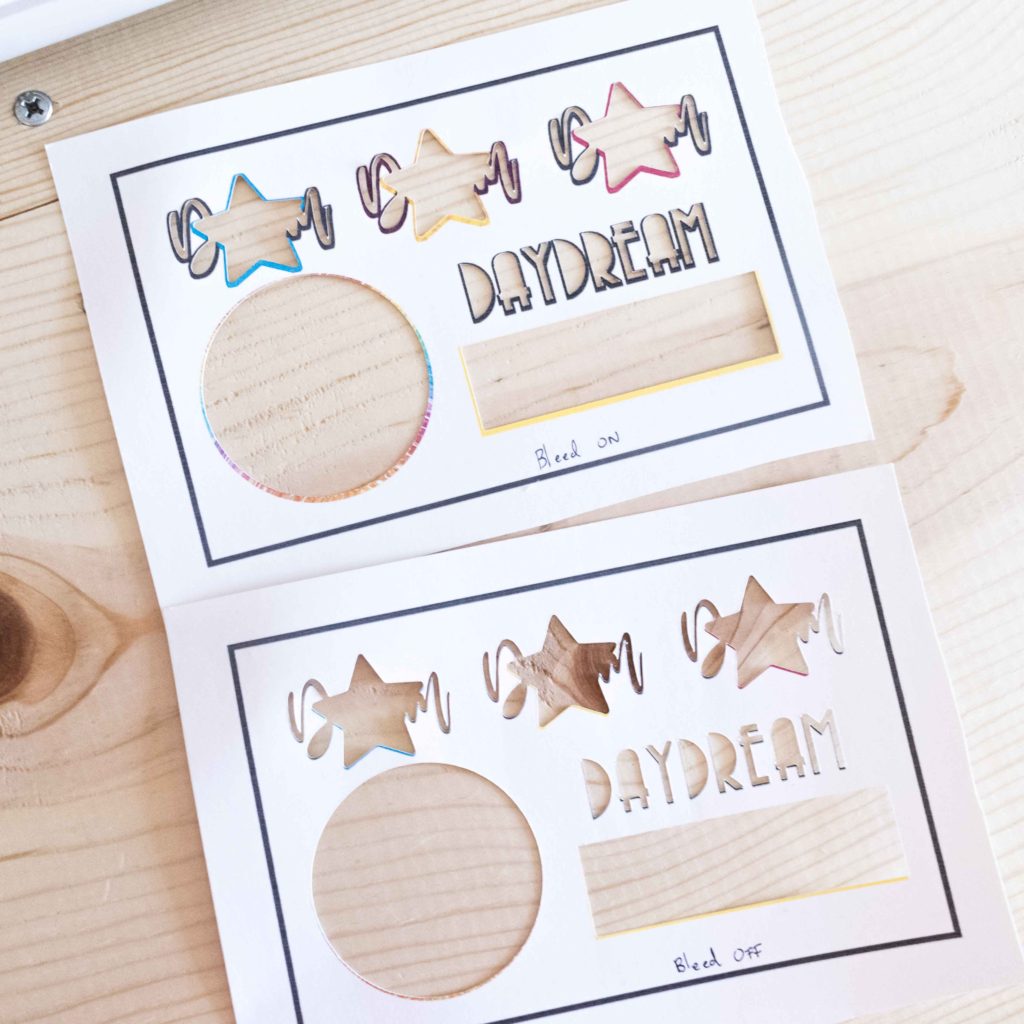
Annotation: Remember that the final size can't be larger than nine.25. x 6.75 in, so if your design is bigger, select the already flatten layer and resize it earlier clicking on Make it.
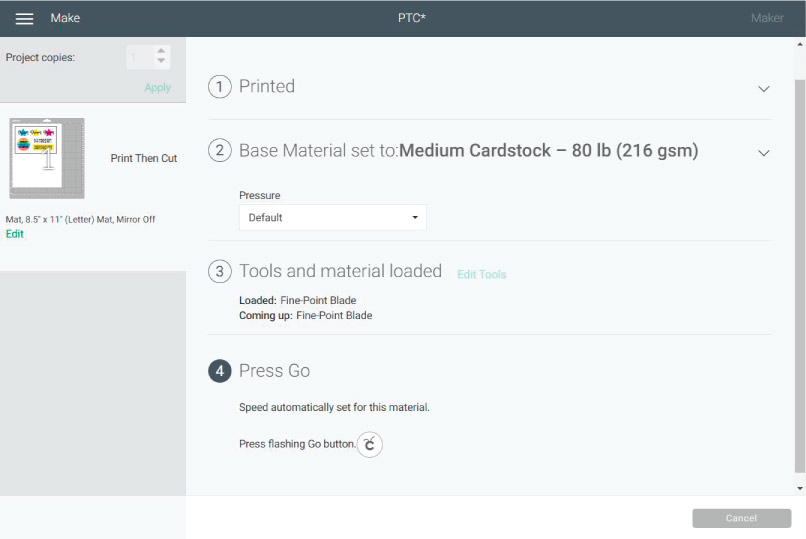
Brand information technology – Cutting Instructions
Finally!
It'due south cutting fourth dimension!
The following screenshot is what you see when you lot click on "Make it." This preview shows yous how your print should await like.
You lot need to make sure that you place the paper on your Cricut Mat the exact mode you lot see it here after you are done printing.
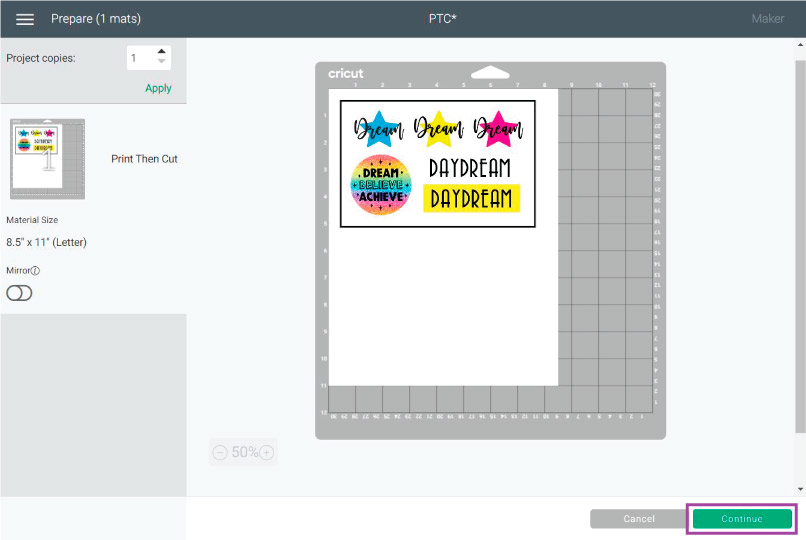
I of the questions I get asked the most is how practise I get rid of the black box for "Print the Cut?"
Unfortunately you can't get rid of it!
The black frame that contains all of the designs you want to cut is a reference for your Cricut to know where to cut.
Printer Set-Up and Printing Process
Finally!
After leaving the mat preview, you will exist given the pace past stride to cut your project.
The first option is "Impress," and it has a button that says "Send to Printer." Go alee and click there.
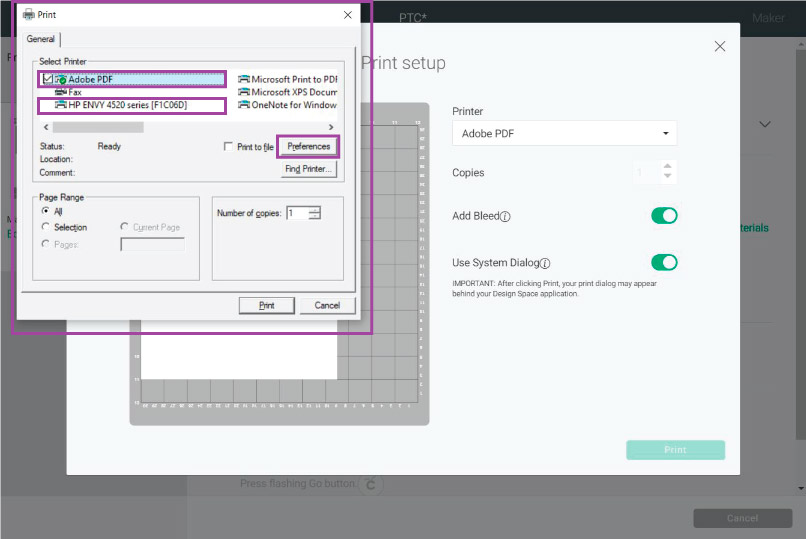
A lilliputian window named "Print Setup" volition open up. From this window, you volition be able to cull your printer, add together extra copies to your projection, turn on bleed, and/or employ your system dialog box.
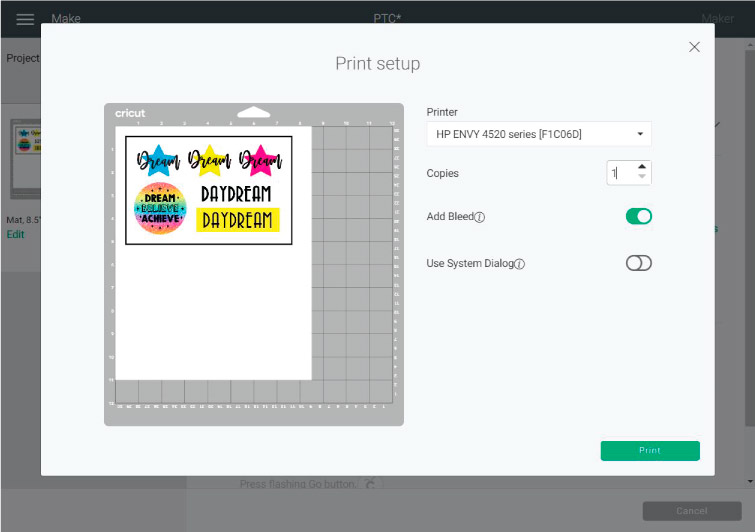
The "System Dialog" is useful if yous need to find your printer, change the blazon of newspaper y'all are using, or want to save your project equally a PDF and print it in a different location.
If your printer is already continued to your computer, y'all can leave this option off.
I usually have "Bleed" on and "Arrangement Dialog" off.
Now…
Can we simply talk virtually bleed a niggling flake?
Understand Bleeding once and for all
I decided to print this project with both "bleed ON" and "Drain OFF." Then allow's take a intermission to encounter the results, and then allow'south resume with our the step to pace tutorial.
The official definition of drain in the Cricut word can be constitute in the "Printer Setup" window, and Information technology says: "Bleed extends ink slightly beyond the border of prototype to eliminate a white margin one time the image is cut."
Check out the following photos and let's chat about drain a little bit more.
-
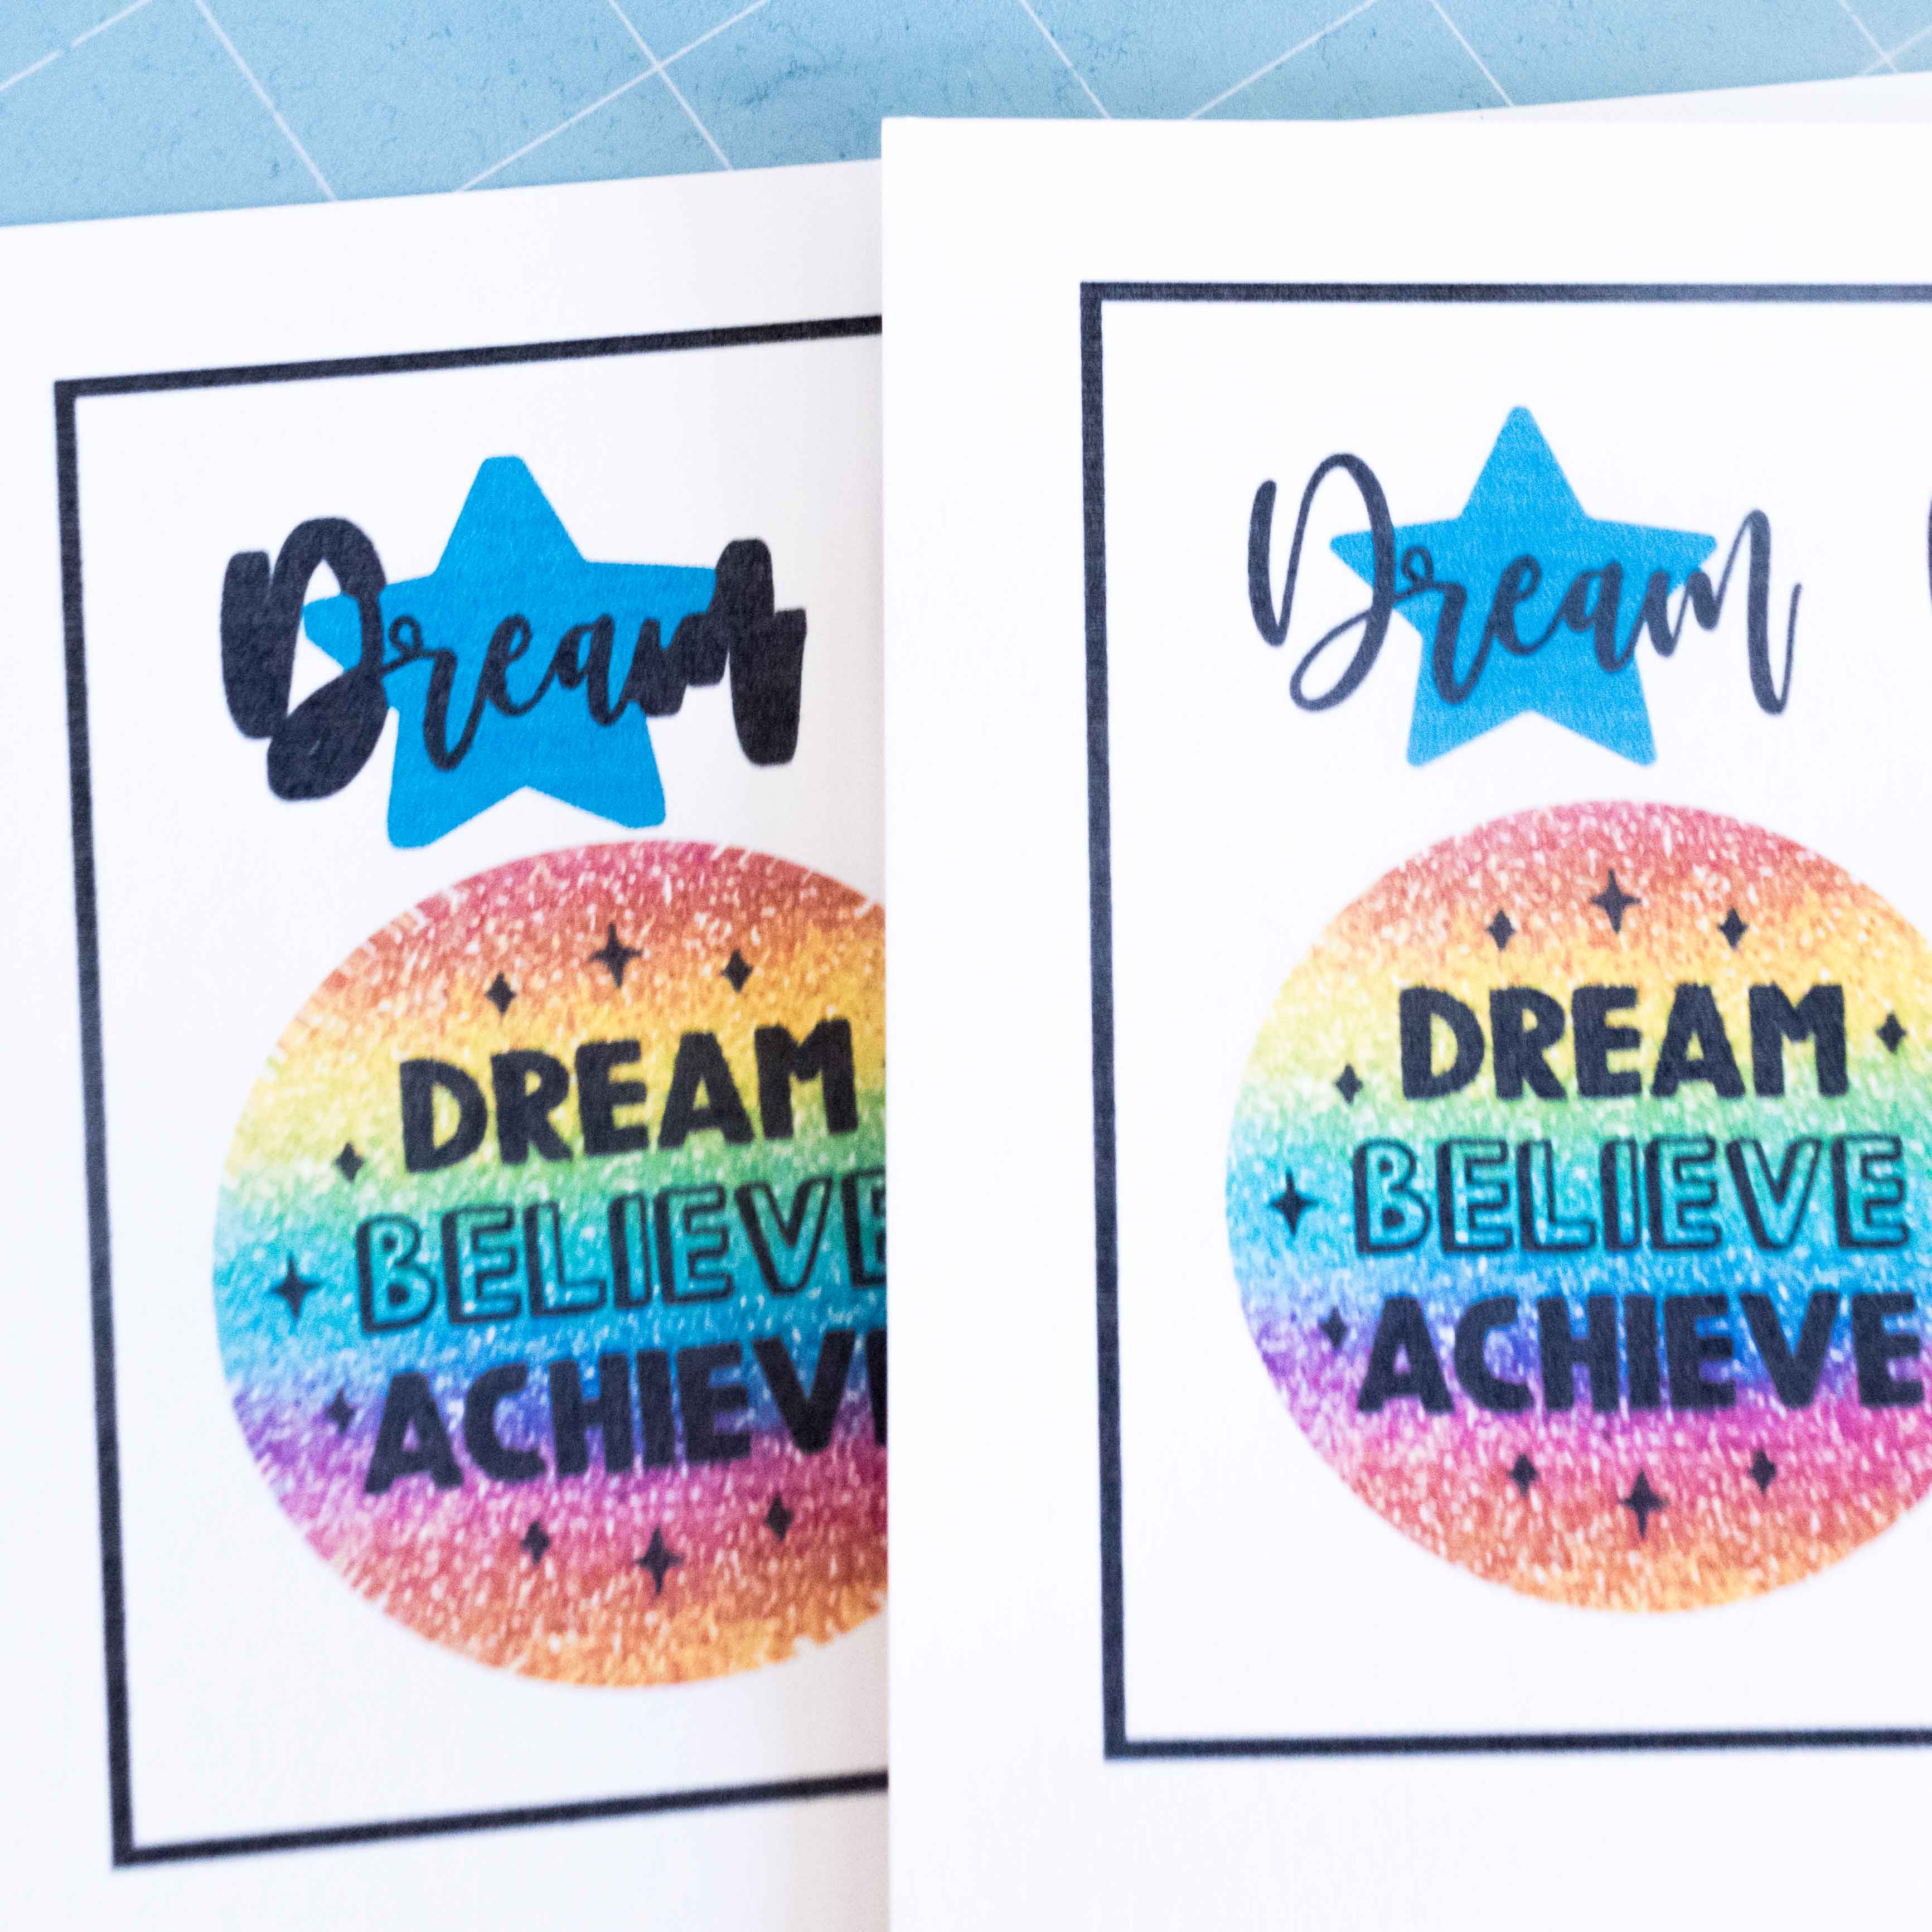
1) Bleed On Left – Bleed Off Correct -

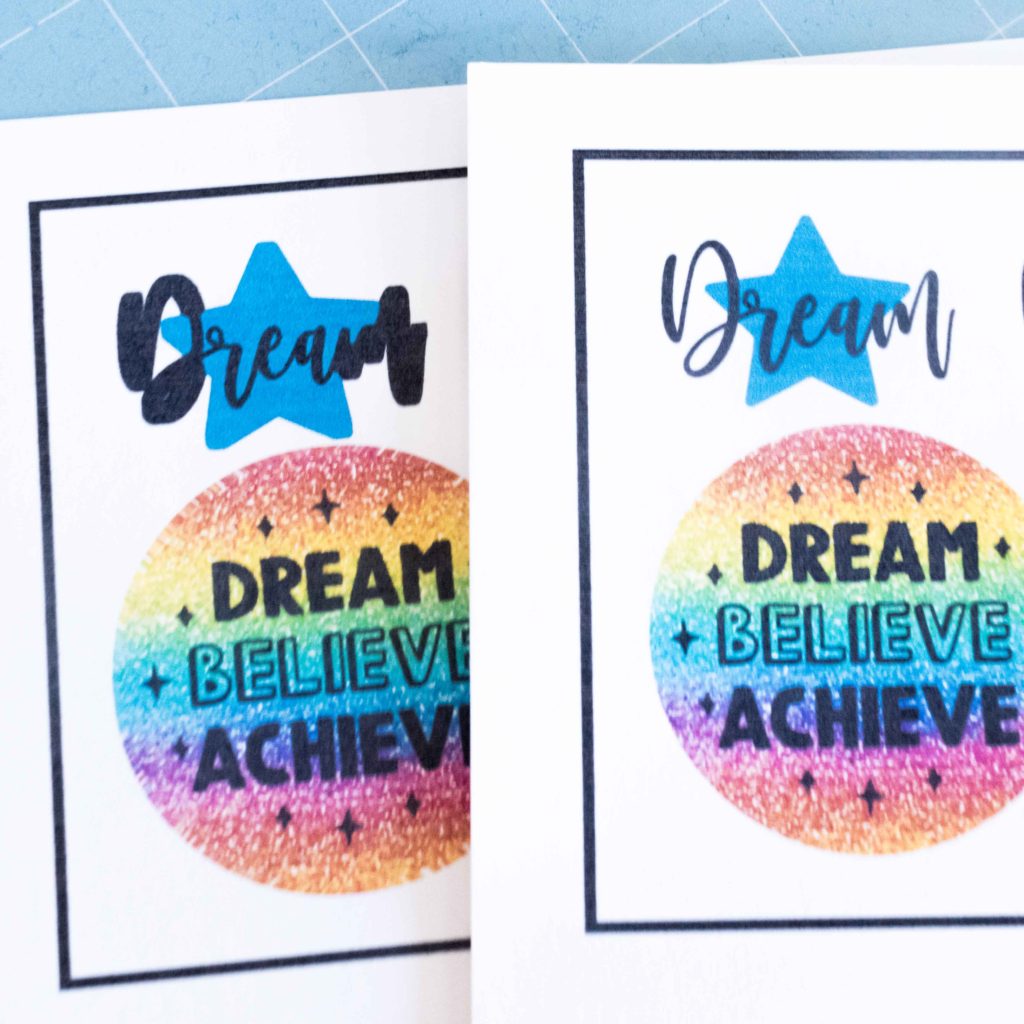
two) Bleed On Top – Bleed Off Lesser -

3) Bleed On Meridian – Bleed Off Bottom

The first photo may scare you or may non considering I am warning yous. Just the starting time fourth dimension I saw this, I thought my "Impress then Cut" wasn't working at all.
Don't you recollect it looks extremely weird?
Thankfully I was incorrect. As you can see, Cricut Design Space extended the ink in every place the blade was supposed to become. Notice that within the designs, the fonts look just fine.
Although Cricut's sensor is really powerful, there's petty room for mistake. The bleed prevents your Auto from cutting within and outside of the identify where information technology is supposed to. For example, photograph number two shows no white border on the cut made with the bleed pick ON.
This is even more axiomatic in the tertiary photo when you lot can meet the "Bleed ON" pick was very compatible, and none of the cuts had an undesirable white edge.

When I turned Bleed OFF, all of the designs had a white border on some parts of the cutting.
So which i should you choose? That's upwards to you to decide. I like the bleed ON for all of my projects.
Now, permit'due south get back into our step by pace tutorial.
Select Materials, Arrange Mat & Cut
After you impress; it'south time for you lot to cull the fabric you printed on.
If you have a Cricut Maker, you need to choose the material from Cricut Design Space. But if you take an Explore, move the dial on your machine. For this tutorial, I used Medium Cardstock.
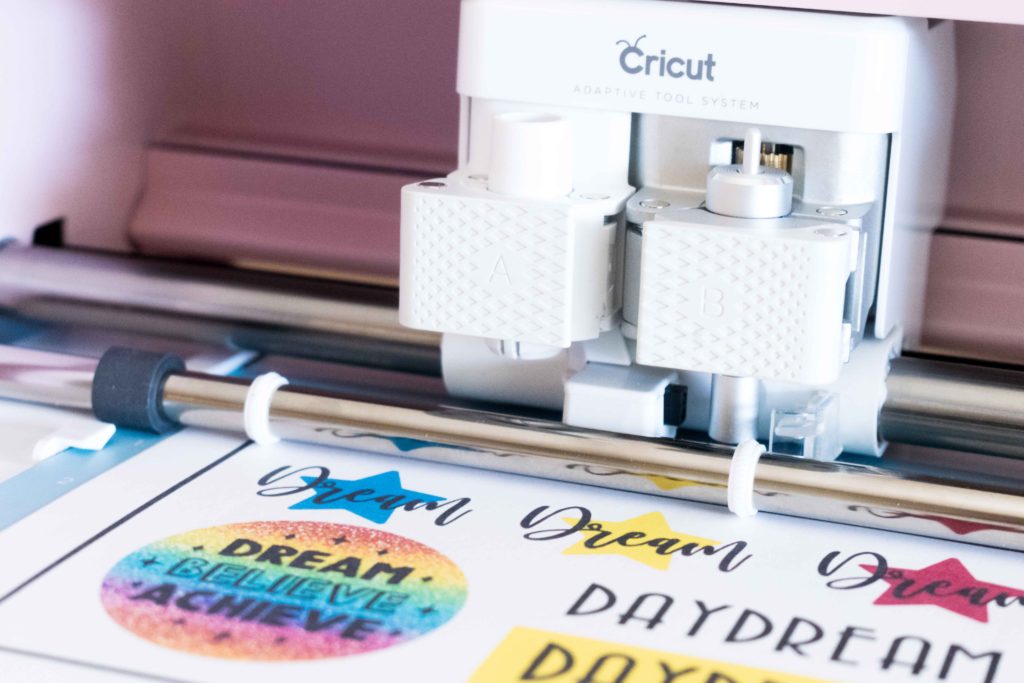
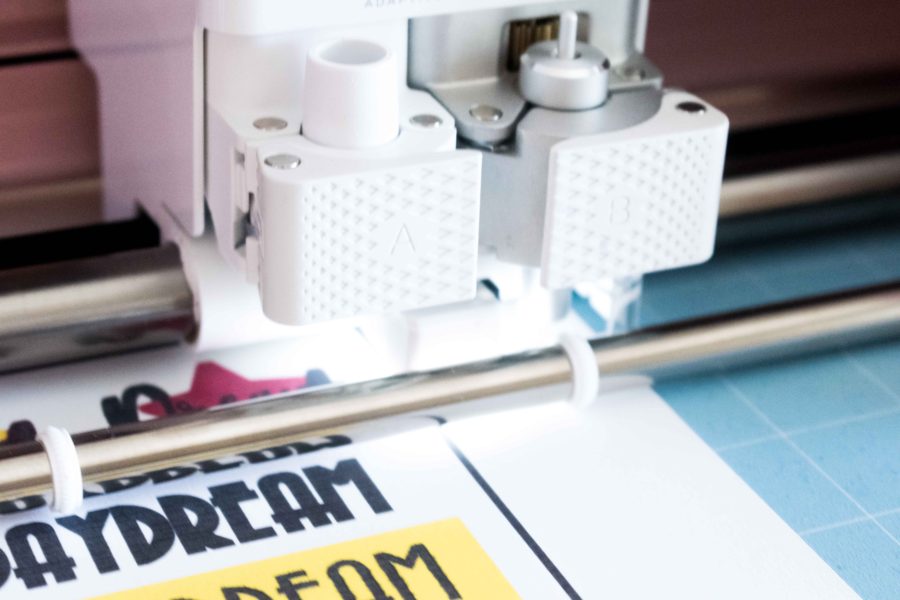
Install fine indicate blade, place the printed project on the mat and load it to the Cricut Machine. Recall that it has to await like in the preview.
If you an Explore Air 2 or Maker and desire your machine to cut faster, switch to Fast Mode and and so press the Make it – Cricut's logo – button on your CRICUT!
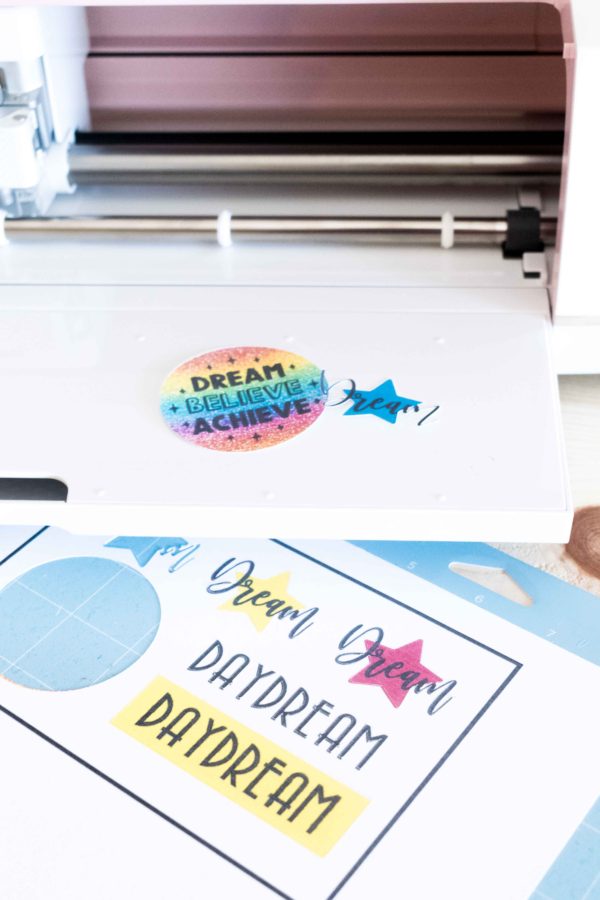
At this very moment, you will run into the magic happen!
-
Sensor Light On -
Remove from Mat -
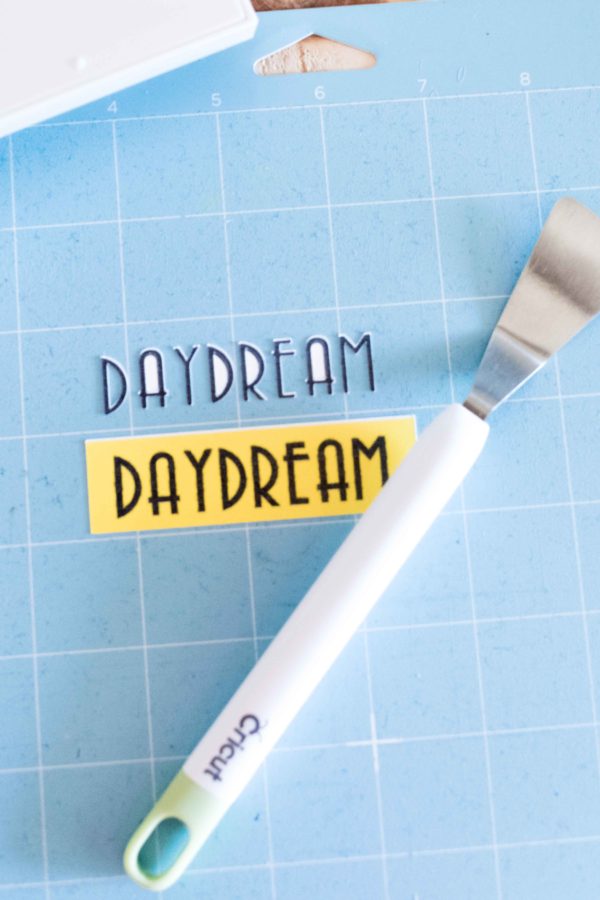
Text: Individual words & Contained in a Shape


The "Print then Cut" sensor volition turn on, and it will offset reading the frame surrounding all of the designs that we need to cutting; once it'due south done reading, the Cricut will cut them all.
When Cricut Design Infinite tells you lot the Cut is done, unload your Mat, remove designs from it.
There y'all have it..…You are PRO at Printing then Cut!
What to do if the Impress And then Cut Selection is Not Working
Nosotros are on our last stretch!
I honestly promise you don't demand this option, but I wanted to signal you lot to good resources if things aren't going the mode they are supposed to.
If you are having any of these bug, check out the following steps that Cricut recommends.
- The sensor light doesn't plough on.
- Your machine isn't cutting along the edges of the printed ima ge.
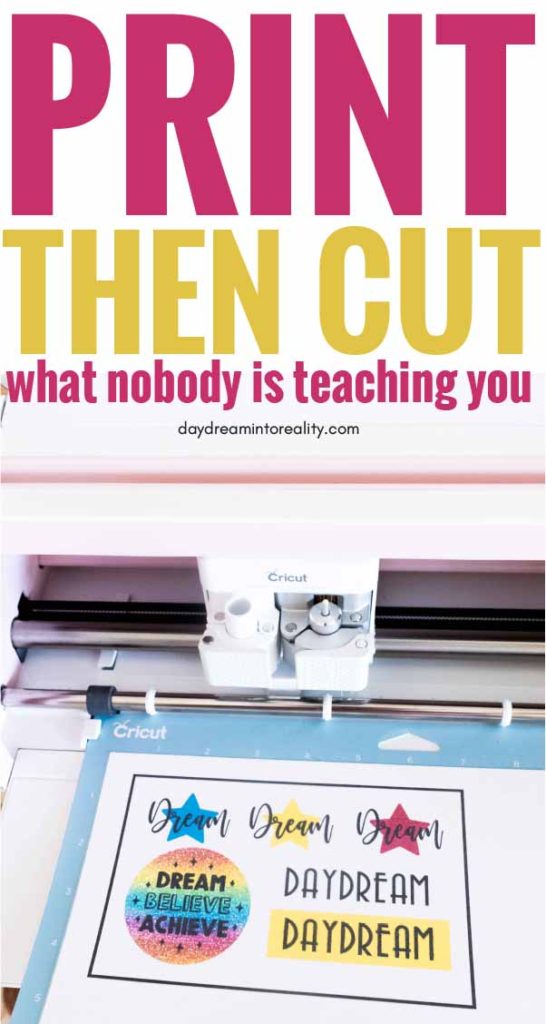

How To Print Multiple Templates At Once On Cricut,
Source: https://www.daydreamintoreality.com/print-then-cut-cricut/
Posted by: gonzalezeartherry2001.blogspot.com
0 Response to "How To Print Multiple Templates At Once On Cricut"
Post a Comment